Home Data Center Project: Formatting NetApp drives for normal use
The following is part of a series of posts called "Building a data center at home".
Living in the SF bay area, you can acquire 2nd hand data center equipment relatively cheap. The following are a series of posts detailing my deep dive in building a cluster with data-center equipment at home (often called a homelab) which consists of 48 CPU cores, 576Gb RAM, 33.6TB storage across 60 x 6Gb/s HDD's with a combined weight of just over 380lb/170kg within a budget of $3000.
- Home Data Center Project: Starting the build - 7 September 2019
- Home Data Center Project: Adding a storage server - 21 September 2019
- Home Data Center Project: Formatting NetApp drives for normal use - 21 September 2019
- Home Data Center Project: Reduction of noise on Isilon X400 - 28 September 2019
- Home Data Center Project: Wiping and configuring Force10 switch - 5 October 2019
- Home Data Center Project: Load balancing multiple ethernet ports - 26 October 2019
- Home Data Center Project: Setting up a VMware vSphere ESXi 6.7 on Dell R610 - 6 November 2019
- Home Data Center Project: Persistent kernel panic and upgrading R710 BIOS - 23 November 2019
- Home Data Center Project: Finished System - 29 November 2019
As a quick disclaimer, this post is highly technical and written for anyone looking to save a bit of cash by buying NetApp drives which are typically cheaper than normal enterprise drives but are often incompatible without some work. This is more for my own reference in future as well, so apologies in advance that this post might be even worse than my typical standard of writing.
The background to this post is described in my previous post here, but as a quick background, I purchased 40 NetApp HDDs, at the time not knowing that due to their sector size of 520 bytes, are incompatible with normal HDD controllers. When booting, the RAID controller sees any of these drives as in a failed state and can do nothing with the drive.
I received these drives just prior to receiving the X400 discussed in this prior post, so
everything in this post is in the context of using one of the R710 servers that make up part of
the current home data-center project.
The steps taken are somewhat a rabbit warren of issues, so I’ve kept everything as a list of bullet points.
- Initially I decide that it is best to make sure that the Perc 6/i RAID controller has the most
recent firmware so that I know that the reason this card currently can’t read these drives is not related to the firmware.
- I download the linux version of the update after booting into Ubuntu Server which I previously
installed on the machine. The script immediately exits with a non-zero exit code as it requires
rpm to work. I find on the documentation page that its actually a RHEL version of the firmware
update and obviously, this is not compatible with Debian linux which is what Ubuntu is based on.
- I create a CentOS 7 live image on a USB and boot into that. I download the firmware update
again and I manage to update the controller firmware to the latest version. Fantastic, this feels pretty easy so far.
- Ok, so the drive controller is now up to date. I reboot to test if the drives now show up in a
ready state instead of failed and unfortunately, its orange across the board. All disks showing as failed still.
- I search deeper online for HUS156060VLS600 and PERC 6/i and find that Dell actually have firmware
updates for this particular drive. Wow, firmware updates for a HDD?? Does that make sense? Might as well give it a try and see what happens.
- I download this update on my current RHEL 7 live instance and run it. Get the error,
This package is not compatible with your system. There is no other output which is extremely
unhelpful.
- More digging around, I find that many people use Dell’s own CentOS image called Dell Support
Live Image. I take a stab at the idea that the compatibility issue is caused by not using this image so I download the support live image, set it up on a USB, and boot it up. This image seems to have a number of GUI tools for the server and will likely come in handy in future.
- I download the firmware update again and run it. The same compatibility error appears… That is
awfully frustrating. Sort of at a lost at this point as to what I’m missing?
- Upon playing with the Dell support site some more, I notice that this update is only listed when
I select RHEL6, but not RHEL7… Maybe the incompatibility is with the update requiring RHEL 6. I attempt to make a live boot of RHEL 6 but this isn’t an easy task as this version has been deprecated for a number of years now.
- Eventually I install CentOS 6 minimal direct on the server overwriting the current Ubuntu
server install. I get the command prompt, enable the NIC so I have internet, curl the update to
download it via the cli, chmod +x and run the update again…
- Same error again. Damn. Maybe I’m just not understanding this firmware update process fully?
I’ve been able to up date BIOS and the PERC 6/i controller firmware but can’t get this to work? Not sure that this update is really going to help the situation either way. Its starting to feel like it won’t help the situation as the issue here isn’t to do with the drive per sae, its due to the way that it has been formatted? Hmmm…
- At this point I’m compelled to pack up the disks and hide them in the corner of the garage to be
forgotten about. I step away for a day or two to hopefully get a bit of a different view point on the issue, as this helps in almost every situation where you can’t gain any ground with an issue.
- I investigate the possibility of purchasing a second hand NetApp storage rack and their equipment
appears to be really cheap. This could be a better option. I’m about the purchase a 14 drive rack
FAS270 when I notice that it mentions Hardware Only. No Licenses. That doesn’t sound good. A
quick search for some specifics on NetApp licenses and I find a well repeated message that unless
you are enterprise level and have an existing NetApp eco-system, then flat out don’t buy NetApp
hardware and expect it to be anything more than a paper weight. Damn… I start packing up the
disks for the garage.
- But alas, I find another post regarding how to reformat these drives to 512 bytes using a package
called sg-utils. Might as well give that a go as it feels like that might crack the issue once and
for all.
- I boot into a CentOS 7 live instance again, install
sg-utils, list the drives and all the
drives come back as a single drive due to the PERC 6/i being a backplane. Of course, I can’t get access to the drives directly through the RAID controller as it basically abstracts all the drives and exposes virtual devices based on what you define in the BIOS for the card. Damn.
- The obvious next step is to try connecting the drive directly to a computer but it turns out
that connecting a SAS drive directly to any given computer turns out to be a pretty difficult task. There isn’t a simple way of doing it via USB and all external enclosures are SATA, not SAS.
- I find a
forum discussion
where someone has previously solved this issue using a Dell H310, flashing new firmware on this
device and then being able to use sg-utls to reformat the drive. I decide that I might as well
try this approach as H310 controllers seem to be pretty cheap on eBay.
- I purchase a cheap
H310off eBay and wait for it to arrive. After a couple of days it
arrives and start looking at how I can flash the firmware to the special version in the forum post, but when I start looking to use it, I find that all the links in the forum post I found are windows based. I find that for a lot of tasks such as this people use FreeDOS which you can boot into using a live USB.
- I use etcher to make a bootable version of FreeDOS, but need some way of adding the files to
the partition as well. Funny that I haven’t come across this issue before, but expanding the partition on a USB drive is actually more difficult than it sounds. After a bit of messing around I find that the best way to handle situations like this is using a bootable version of GParted. I boot with this USB, and within the GUI expand the FreeDOS partition to 511MB. The original image supplied for FreeDOS is in FAT16 which by the looks of things is limited to a max partition size of 512MB so re-partitioning to anything larger than that becomes problematic.
- I copy the files listed in the forum post to the USB, boot FreeDOS and feel that I’m really
close to success here. I move to the directory containing the files, run
megarec -writesbr 0 sbrempty.bin and wait… I start feeding my 4 month old son, continue to
wait, and after 15 minutes start to search for how long this flashing process typically takes.
- Turns out that
megarecdoesn’t work in most cases onR710orR610servers. Wow, this
is really becoming a deep problem to solve.
- Not to give up at this point, I break open a desktop computer that I also own to see if I
might be able to mount the controller on a different motherboard. I remove the video card of a
desktop computer I use for my VR and occasional gaming and place the H310 in it place.
- No mater what I do, it appears that the BIOS of the desktop doesn’t like having the controller
onboard in any given configuration. Man, this project is just getting to a point of hilarity. How can I keep getting knocked back in so many small ways which all are absolute showstoppers.
- I can’t seem to be able to flash a
H310with the tools at hand and start looking at maybe
purchasing a cheap motherboard online when I notice that a good number of sellers actually have
H310 controllers available that have already been flashed into IT mode, the mode which the
firmware I’m trying to flash onto the card exposes. I decide to pull the trigger and purchase
one. I’ve spent this much time already, whats an extra $40 of cash.
- After a few more days, I have a flashed
H310, I boot into CentOS 7 live instance again and
install sg-utils again via sudo yum install sg3_utils (I keep my boot USBs immutable which
has both benefits and pain points).
- And here is the moment of truth, after all this messing around, I should be able to directly
access one of the drives. I connect one to the new H310 which I’ve installed into one of the
R710s, turn everything on, and the disk doesn’t spin up. Ah, silly of me, but the drive also
needs power to work! The cable from the H310 is only a data cable.
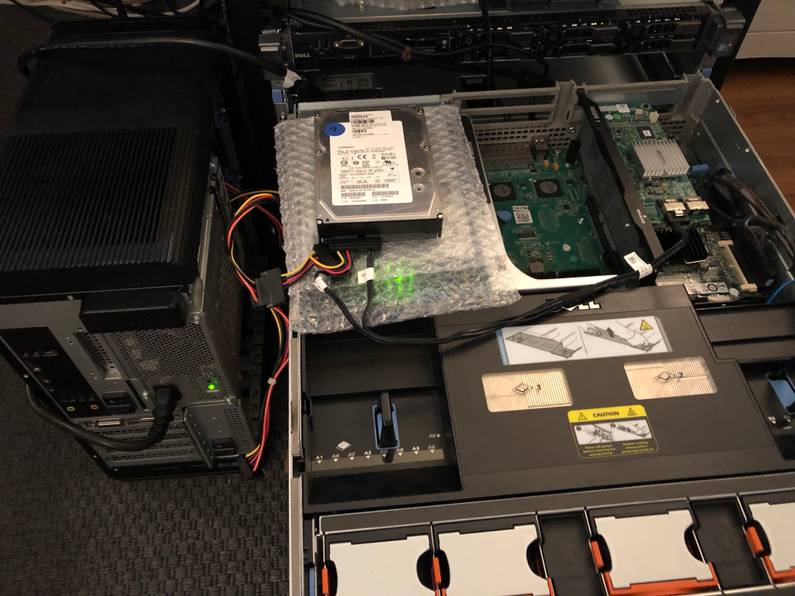
- At this point though, there is no available power cables in the
R710. I look inside the
desktop computer I had the H310 installed in earlier and there are a few compatible power
cables for the drive. Time to amalgamate the two computers to get this happening! I get it all
set up, the disk spins up and everything looks good!
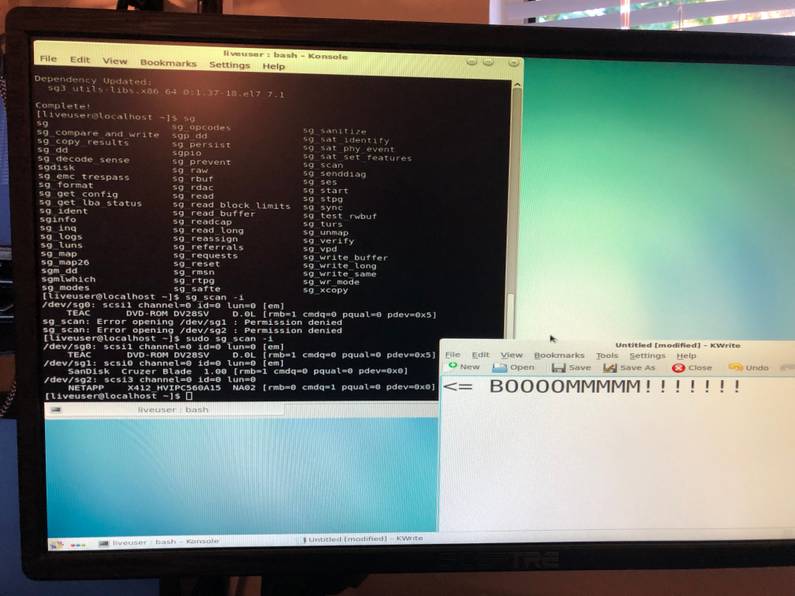
- I try
sg-utilsagain, try listing the available disks and BOOM, the disk shows up!!!
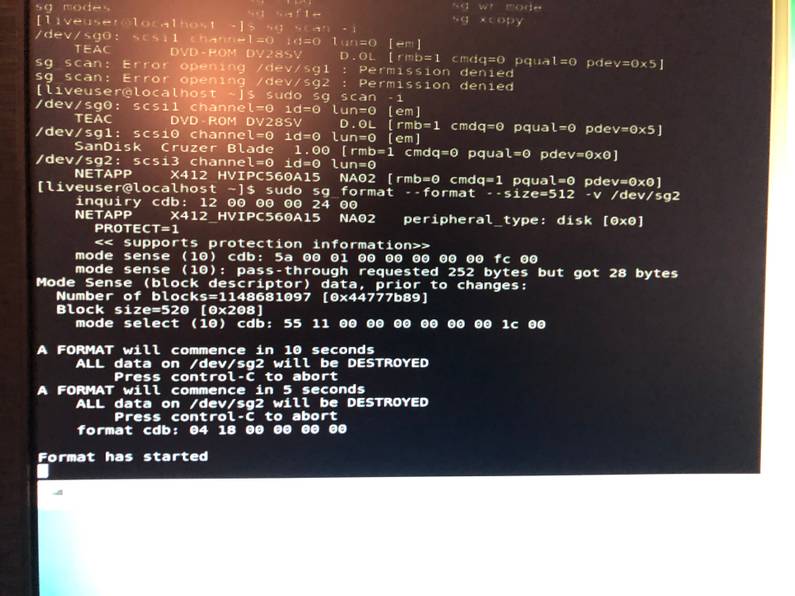
- I try formating the disk and finally, after going through such a weird and varied path to get
here, I finally see one of these disks being reformatted to the correct sector size.
- It takes about 40 minutes to format, and the heat that these disks give off during a format is
unbelievable. I could literally cook something on the disk while it is formatting and I need to wait for about 5 minutes before I’m able to touch the drive after its finished.
I format a number of these drives, load them in the normal bays for the R710, put the PERC 6/i
back in and boot up. I jump into the bios look at the drives and they’re all showing up as in a
ready state.
Wow, got there in the end!!! This took a lot of work but knowing that I can buy these types of drives for real cheap and can use them for any server situation is fantastic.


