Adding Helm to on premises Kubernetes cluster
The following is part of a series of posts called "Repurposing old equipment by building a Kubernetes cluster".
While old equipment by itself is in general not very useful unless you find a particular use case, by combining a number of old devices you can build a more powerful system that can span perhaps a number of use cases. Kubernetes is a perfect candidate to be able to do this. I had a number of old laptops laying about and decided to test this theory out.
- Creating a bare-bones on premises Kubernetes cluster from old hardware - 30 August 2019
- Adding persistance to on premises Kubernetes cluster - 1 September 2019
- Adding Helm to on premises Kubernetes cluster - 2 September 2019
- Adding an Ingress to on premises Kubernetes cluster without load balancer - 2 September 2019
- Adding Jenkins to on premises Kubernetes cluster via Helm - 4 September 2019
- Adding Prometheus to on premises Kubernetes cluster via Helm - 4 September 2019
Helm is basically a package manager for Kubernetes. Helm utilizes ‘charts’ which are instructions for installing full deployments into a Kubernetes cluster. A good way to think of charts are publicly accessible docker compose configurations but in the context of Kubernetes. For example, a chart might install a database deployment, an api container deployment, a service for each the api and database and likely a volume claim for the database.
Helm requires you install a local executable on your machine much like you have to with kubectl.
I installed this binary by downloading it and adding it to my /usr/local/bin directory but it is
also possible to use homebrew on Mac as well. This binary communicates with Tiller that you
install within your cluster.
To initialize Helm its simply a case of running the init command. Helm always works against which ever context (cluster) kubectl is set to so remember to check first if you have multiple contexts in your kube config.
# Because I set up RBAC earlier for the dashboard and a number of other things, I need to set up
# Tiller with permissions as well
$ kubectl -n kube-system create sa tiller
serviceaccount/tiller created
$ kubectl create clusterrolebinding tiller --clusterrole cluster-admin --serviceaccount=kube-system:tiller
clusterrolebinding.rbac.authorization.k8s.io/tiller created
# Now init with the given service account
$ helm init --service-account tiller
Once this is done, Tiller (the server side part of helm) will be installed. I can now use helm to install packages. One good start for testing helm and this cluster is ‘kubeapps’ which is a GUI front-end for helm which allows you to explore other helm charts and install them.
helm repo add bitnami https://charts.bitnami.com/bitnami
helm install --name kubeapps --namespace kubeapps bitnami/kubeapps
At this point, a large contingent on new containers start up. I expose what appears to be the service for the kubeapps dashboard (service/kubeapps-internal-dashboard) by forwarding that servers port to my local. This is done by
$ kubectl port-forward --namespace kubeapps service/kubeapps-internal-dashboard  8080:8080
Forwarding from 127.0.0.1:8080 -> 8080
Forwarding from [::1]:8080 -> 8080
Handling connection for 8080
At this point I check localhost:8080 and get the dashboard which can be logged in via the same
bearer token I created when setting up the kubernetes dashboard earlier.
Initially the kubeapps dashboard doesn’t seem to work very well unfortunately. It still feels like very early days for the Helm ecosystem so I’m not expecting extremely high quality from an app such as this.
I try and install Jenkins but I get an auth error, so try Weave Scope instead and get the same
error. Damn. Doesn’t look like I can really trust the kubeapps dashboard. I’m still able to install
things directly via Helm on the command line though. Might just uninstall kubeapps as it doesn’t
really seem to provide too much value. I do this via helm delete kubeapps and after a short wait,
all the artifacts related to kubeapps are gone. Helm really does make things extremely easy.
Once kubeapps is removed, I install Weave Scope directly via Helm which is a pretty simple process:
$ helm install --name weave-scope-test stable/weave-scope
NAME:   weave-scope-test
LAST DEPLOYED: Mon Sep  2 18:52:38 2019
NAMESPACE: default
STATUS: DEPLOYED

RESOURCES:
==> v1/ConfigMap
NAME                                DATA  AGE
weave-scope-weave-scope-test-tests  1     2s

==> v1/Pod(related)
NAME                                                    READY  STATUS             RESTARTS  AGE
weave-scope-agent-weave-scope-test-68mwl                0/1    ContainerCreating  0         2s
weave-scope-agent-weave-scope-test-f5m8h                0/1    ContainerCreating  0         2s
weave-scope-agent-weave-scope-test-mrjt8                0/1    ContainerCreating  0         2s
weave-scope-agent-weave-scope-test-mvptk                0/1    ContainerCreating  0         2s
weave-scope-agent-weave-scope-test-x9rgp                0/1    ContainerCreating  0         2s
weave-scope-agent-weave-scope-test-xzv6l                0/1    ContainerCreating  0         2s
weave-scope-frontend-weave-scope-test-78d78cf9fd-5ql92  0/1    ContainerCreating  0         2s

==> v1/Service
NAME                          TYPE       CLUSTER-IP     EXTERNAL-IP  PORT(S)  AGE
weave-scope-test-weave-scope  ClusterIP  10.111.125.49  <none>       80/TCP   2s

==> v1/ServiceAccount
NAME                                SECRETS  AGE
weave-scope-agent-weave-scope-test  1        2s

==> v1beta1/ClusterRole
NAME                                AGE
weave-scope-agent-weave-scope-test  2s

==> v1beta1/ClusterRoleBinding
NAME                          AGE
weave-scope-test-weave-scope  2s

==> v1beta1/DaemonSet
NAME                                DESIRED  CURRENT  READY  UP-TO-DATE  AVAILABLE  NODE SELECTOR  AGE
weave-scope-agent-weave-scope-test  6        6        0      6           0          <none>         2s

==> v1beta1/Deployment
NAME                                   READY  UP-TO-DATE  AVAILABLE  AGE
weave-scope-frontend-weave-scope-test  0/1    1           0          2s


NOTES:
You should now be able to access the Scope frontend in your web browser, by
using kubectl port-forward:

kubectl -n default port-forward $(kubectl -n default get endpoints \
weave-scope-test-weave-scope -o jsonpath='{.subsets[0].addresses[0].targetRef.name}') 8080:4040

then browsing to http://localhost:8080/.
For more details on using Weave Scope, see the Weave Scope documentation:

https://www.weave.works/docs/scope/latest/introducing/
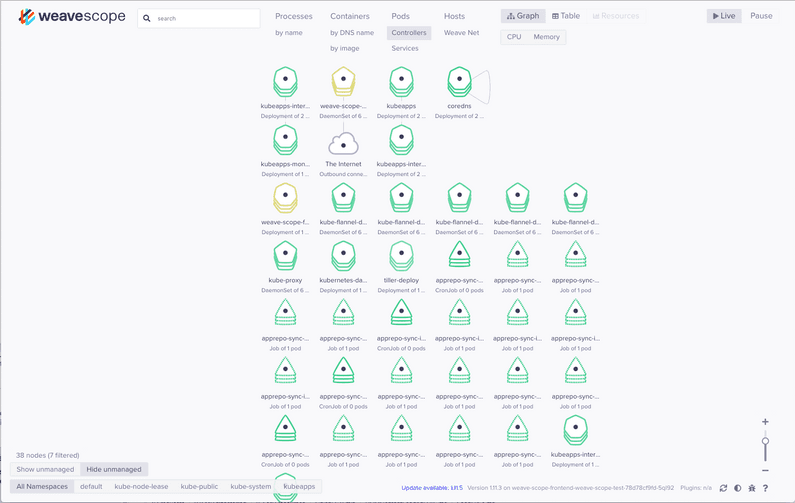
Running their helpful command to forward the service via proxy brings up the interface on
localhost:8080.
Weave scope is fantastic for visualizing your containers and how they interconnect within the service mesh. There isn’t much to see above at the moment obviously as there isn’t really any, communication between containers, but when you have a good number of services that interact, it can be a very helpful tool.
